Ambulatio
Ambulatio is the operator software for the HW module "Gait Analyser". It allows to communicate with the HW module, which can contain up to 4 IMU sensors. The API described in the Gait Analyser project is used for communication. A serial interface with the following parameters is used for communication:
- 921600 Baud rate
- Parity: none
The basic configuration can be found in the config.ini file. Supported settings:
- port - serial port name.
- Linux:
/dev/ttyACM0or/dev/ttyUSB0 - Windows:
COMx(need to find the actual port as it was mapped to the system)
- Linux:
- debug (defaut 0) - set the detailed communication dump
- data_dir - output directory dor data files. Default location is working directory af Ambulatio SW.
Running from source code
Dependent packages: wxPython, Pyserial, Numpy
python3 ./ambulatio.pyInstalation
- unpack downloaded archive
- rename file
config.ini.defaulttoconfig.iniand set desired parameters. - run file
ambulatio
How it works
- connect HW module to PC
- Run software
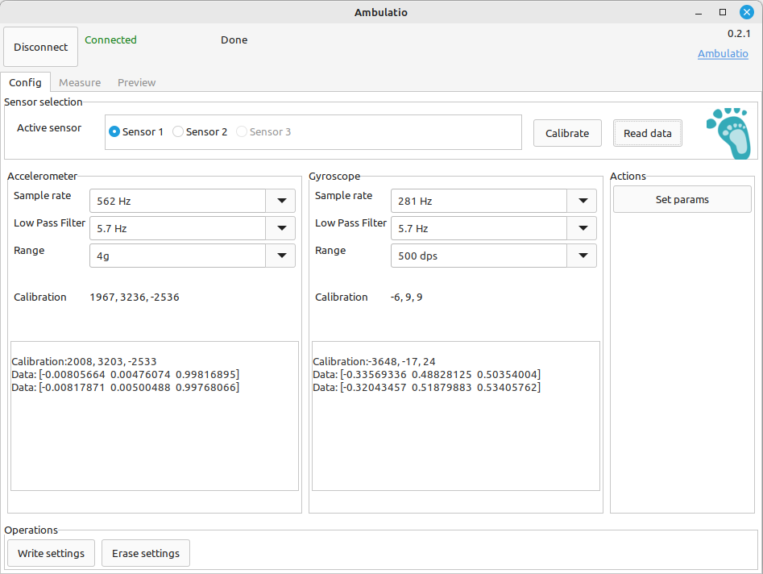
Ambulationand clickConnect. The settings from HW module is loaded into SW - When
Active sensoris changed, settings from selected sensor is loaded
Change sensor settings
An IMU sensor consists of accelerometer, gyroscope and magnetometer. For each sensor, the Sample rate, Low pass filter and Range can be set. The setting can be temporary or permanent.
Temporary setting is valid until next reset/power on of module.
This is done by button Set
Permanent setting is stored to persistent memory of HW module.
After setting desired parameters, click on button Write settins
Erase settings - all setting will be erased from module persistent memory.
After next connection, the default parameters will be used.

Measure
Every sensor has own calibration.
We recommend that the calibration is done in a resting state, with all connected sensors placed on a solid support.
The orientation of each sensor should be such that the gravitational acceleration vector is oriented to the `z' axis of the sensor.
Calibrate - Run the sensor calibration. It will take approx. 2 s. This action take temporary calibration.
Write calibration - write the calibration to persistent memory of HW module. The actual calibration is showed in Config tab under Set button.
Start - run the measurement
Record date - Measured data will be saved in CSV file.

 Releases

 Contributors
 Languages
 Relations