


Universal Multi-Display Library
New features in version 1.0.0
- touch controller support,
- multidisplay touch support,
- available touch drivers CST820, FT6X36.
Overview
The Universal Multi-Display Library, or UMD for short, is a versatile graphics library tailored for embedded applications. It offers a unified collection of graphics primitives, facilitating tasks such as rendering text and images, correcting display resolution, and efficiently managing multiple displays within your project.
Key feautures:
- support for multiple display technologies (e.g. TFT LCD, EINK, OLED, ...),
- support for multiple display interfaces (e.g. SPI, Parallel 8bit, I2C, ...),
- easy reimplementation for various MCU frameworks (e.g. Arduino, MBED, ...),
- intuitive high-level manipulation with multiple displays,
- designed for ESP32, ESP8266 and STM32 MCU platforms.
The library is designed modularly to be independent of display technology and communication interface. The solution supports standard communication interfaces: Serial Peripheral Interface (SPI), Inter-Integrated Circuit (I2C), and 8-bit Parallel Peripheral Interface (PPI 8-bit), but can be extended to include other specialized variants of these interfaces.
The library offers software image correction for displays with rectangular pixels and enables control of multiple displays simultaneously in various operational modes. In a group of displays, there are three control modes available: SINGLE - each display is treated as a separate screen, MIRROR - displays reflect the same content, and EXTEND - displays are interpreted as one extended screen that can take on non-standard shapes.
Graphics Primitives To Work With
- vector graphics (point, line, rectangle, circle, ellipse, triangle, polygon),
- pictures (1,2,4,8,16 bpp bitmap, xbm),
- text (using various fonts, like GLCD or AdafruitGFX).
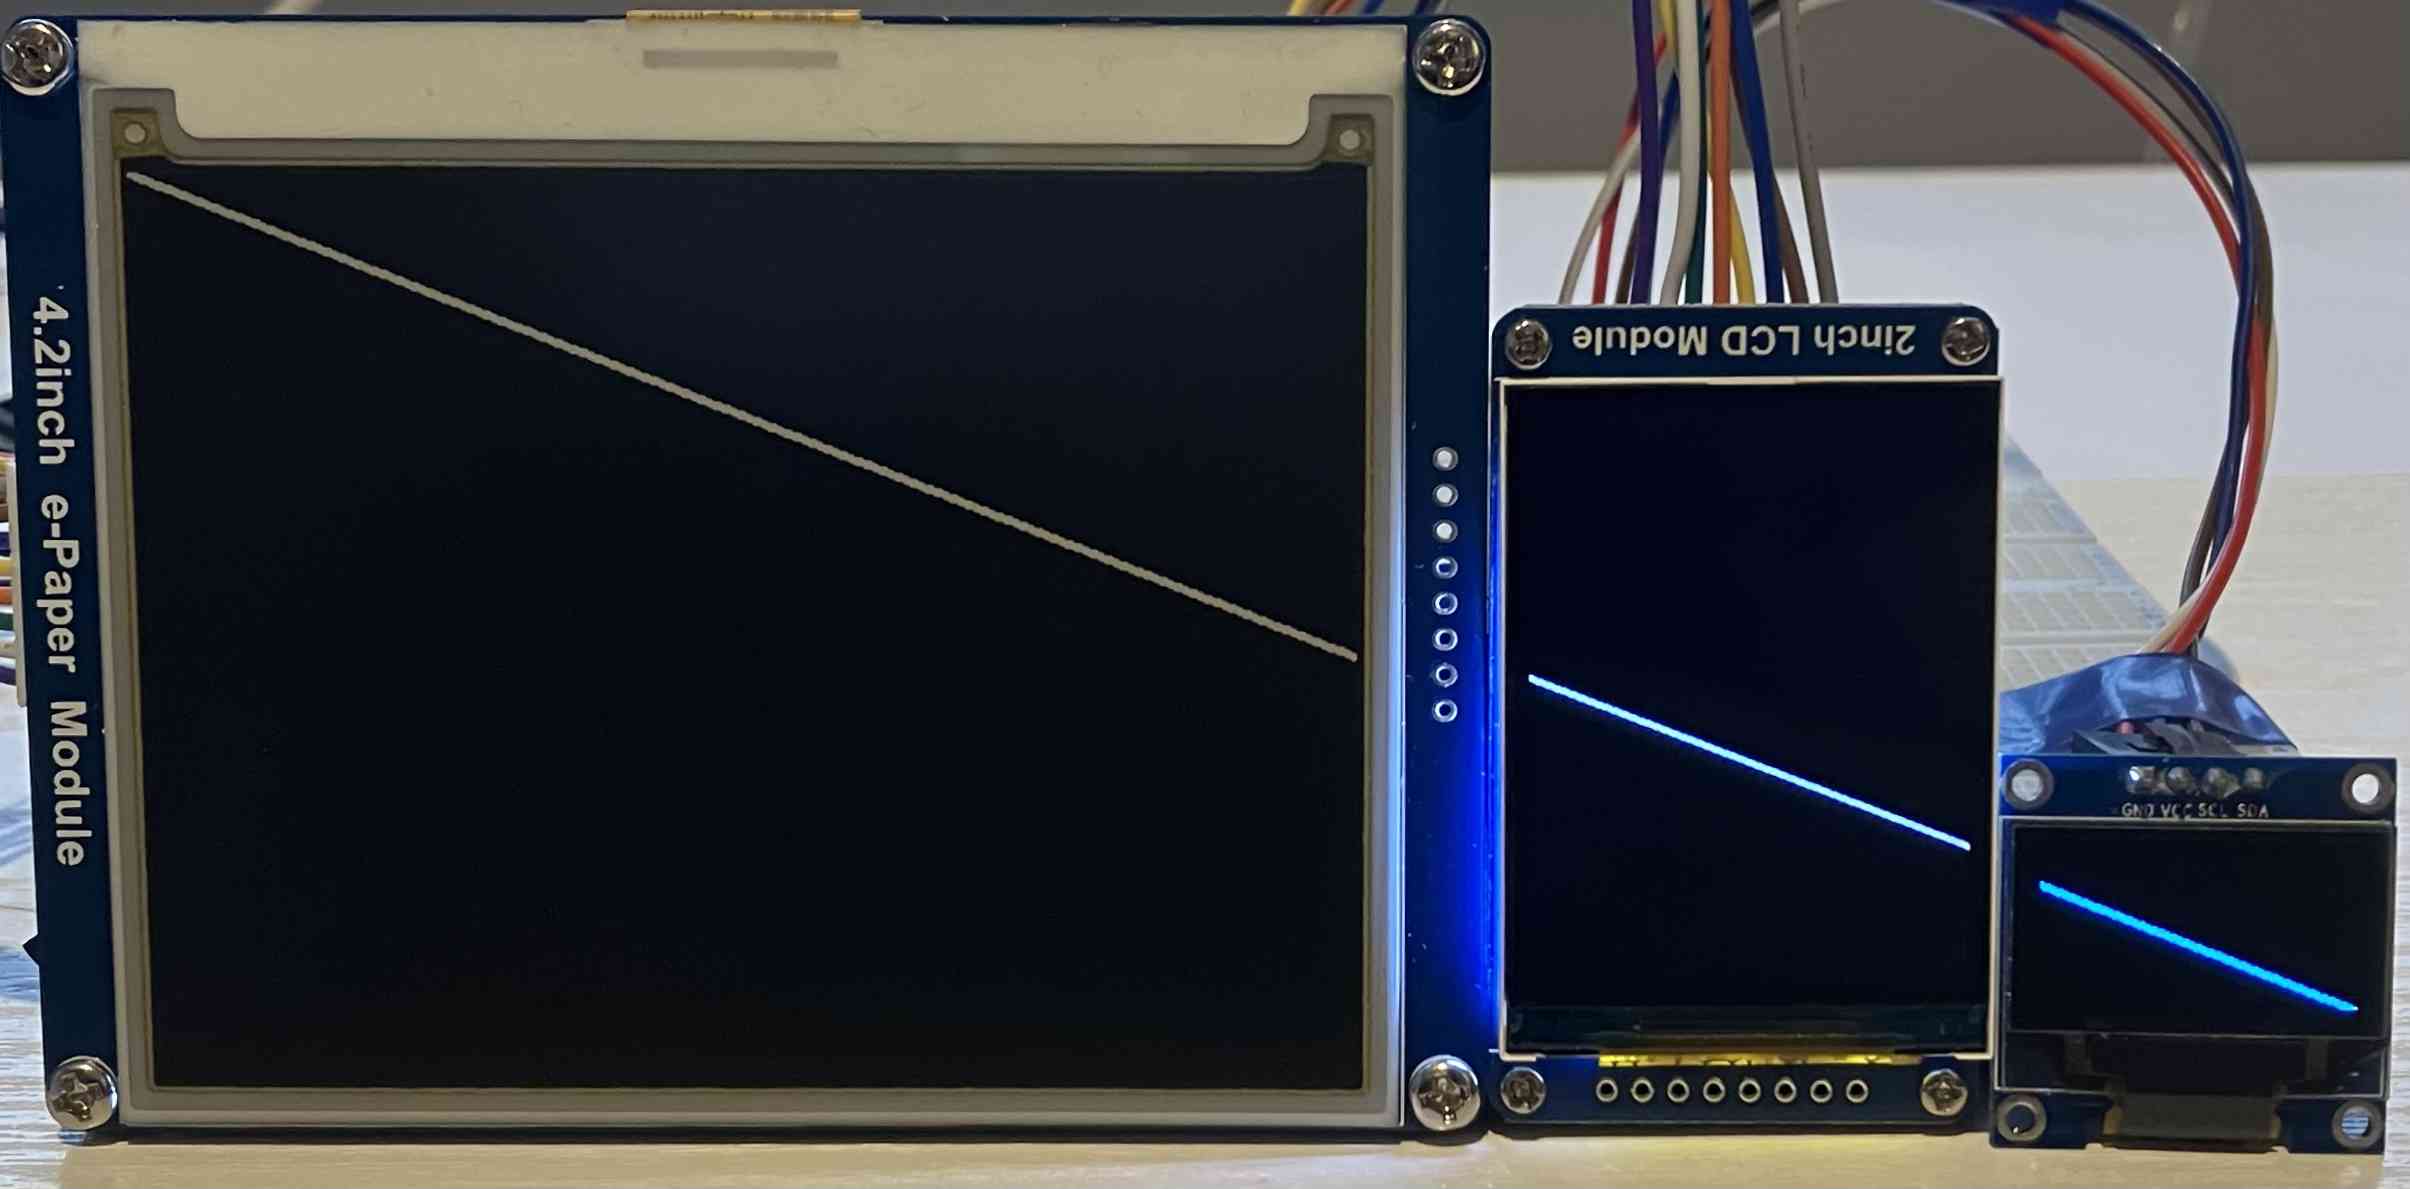
Currently Supported Displays
There's a list of compatible and tested display drivers for UMD library.
TFT LCD
| Driver Manufacturer | Driver model | Resolution (px) | Total Colors | Peripheral Interface |
|---|---|---|---|---|
| ILITEK | ILI9163 | 128x128 | 65536 (HIGH COLOR) | SPI 4W, SPI 3W (via MCP23S17), PARALLEL 8bit |
| ILITEK | ILI9327 | 240x400 | 65536 (HIGH COLOR) | SPI 4W, SPI 3W (via MCP23S17), PARALLEL 8bit |
| ILITEK | ILI9341 | 240x320 | 65536 (HIGH COLOR) | SPI 4W, SPI 3W (via MCP23S17), PARALLEL 8bit |
| ILITEK | ILI9481 | 320x480 | 65536 (HIGH COLOR) | SPI 4W, SPI 3W (via MCP23S17), PARALLEL 8bit |
| SITRONIX | ST7735S | 128x160 | 65536 (HIGH COLOR) | SPI 4W, SPI 3W (via MCP23S17), PARALLEL 8bit |
| SITRONIX | ST7789 | 135x240 | 65536 (HIGH COLOR) | SPI 4W, SPI 3W (via MCP23S17), PARALLEL 8bit |
| SITRONIX | ST7789 | 240x320 | 65536 (HIGH COLOR) | SPI 4W, SPI 3W (via MCP23S17), PARALLEL 8bit |
| SITRONIX | ST7796 | 320x480 | 65536 (HIGH COLOR) | SPI 4W, SPI 3W (via MCP23S17), PARALLEL 8bit |
| HIMAX | HX8347-D | 240x320 | 65536 (HIGH COLOR) | SPI 4W, SPI 3W (via MCP23S17), PARALLEL 8bit |
EPD
| Display Manufacturer | Display model | Resolution (px) | Total Colors | Peripheral Interface |
|---|---|---|---|---|
| WAVESHARE | 2in66b | 152x296 | 3 (RED, BLACK, WHITE) | SPI 4W |
| WAVESHARE | 4in20c | 400x300 | 3 (YELLOW, BLACK, WHITE) | SPI 4W |
| WAVESHARE | 5in83b | 648x480 | 3 (RED, BLACK , WHITE) | SPI 4W |
| WAVESHARE | 7in50a | 800x480 | 2 (BLACK, WHITE) | SPI 4W |
OLED
| Driver Manufacturer | Driver model | Resolution (px) | Total Colors | Peripheral Interface |
|---|---|---|---|---|
| SINO WEALTH | SH1106 | 128x64 | 2 (Black, WHITE) | SPI 4W |
| SOLOMON SYSTECH | SSD1306 | 128x32 | 2 (Black, WHITE) | I2C |
| SOLOMON SYSTECH | SSD1306 | 128x64 | 2 (Black, WHITE) | I2C |
| SOLOMON SYSTECH | SSD1351 | 128x128 | 65536 (HIGH COLOR) | SPI 4W |
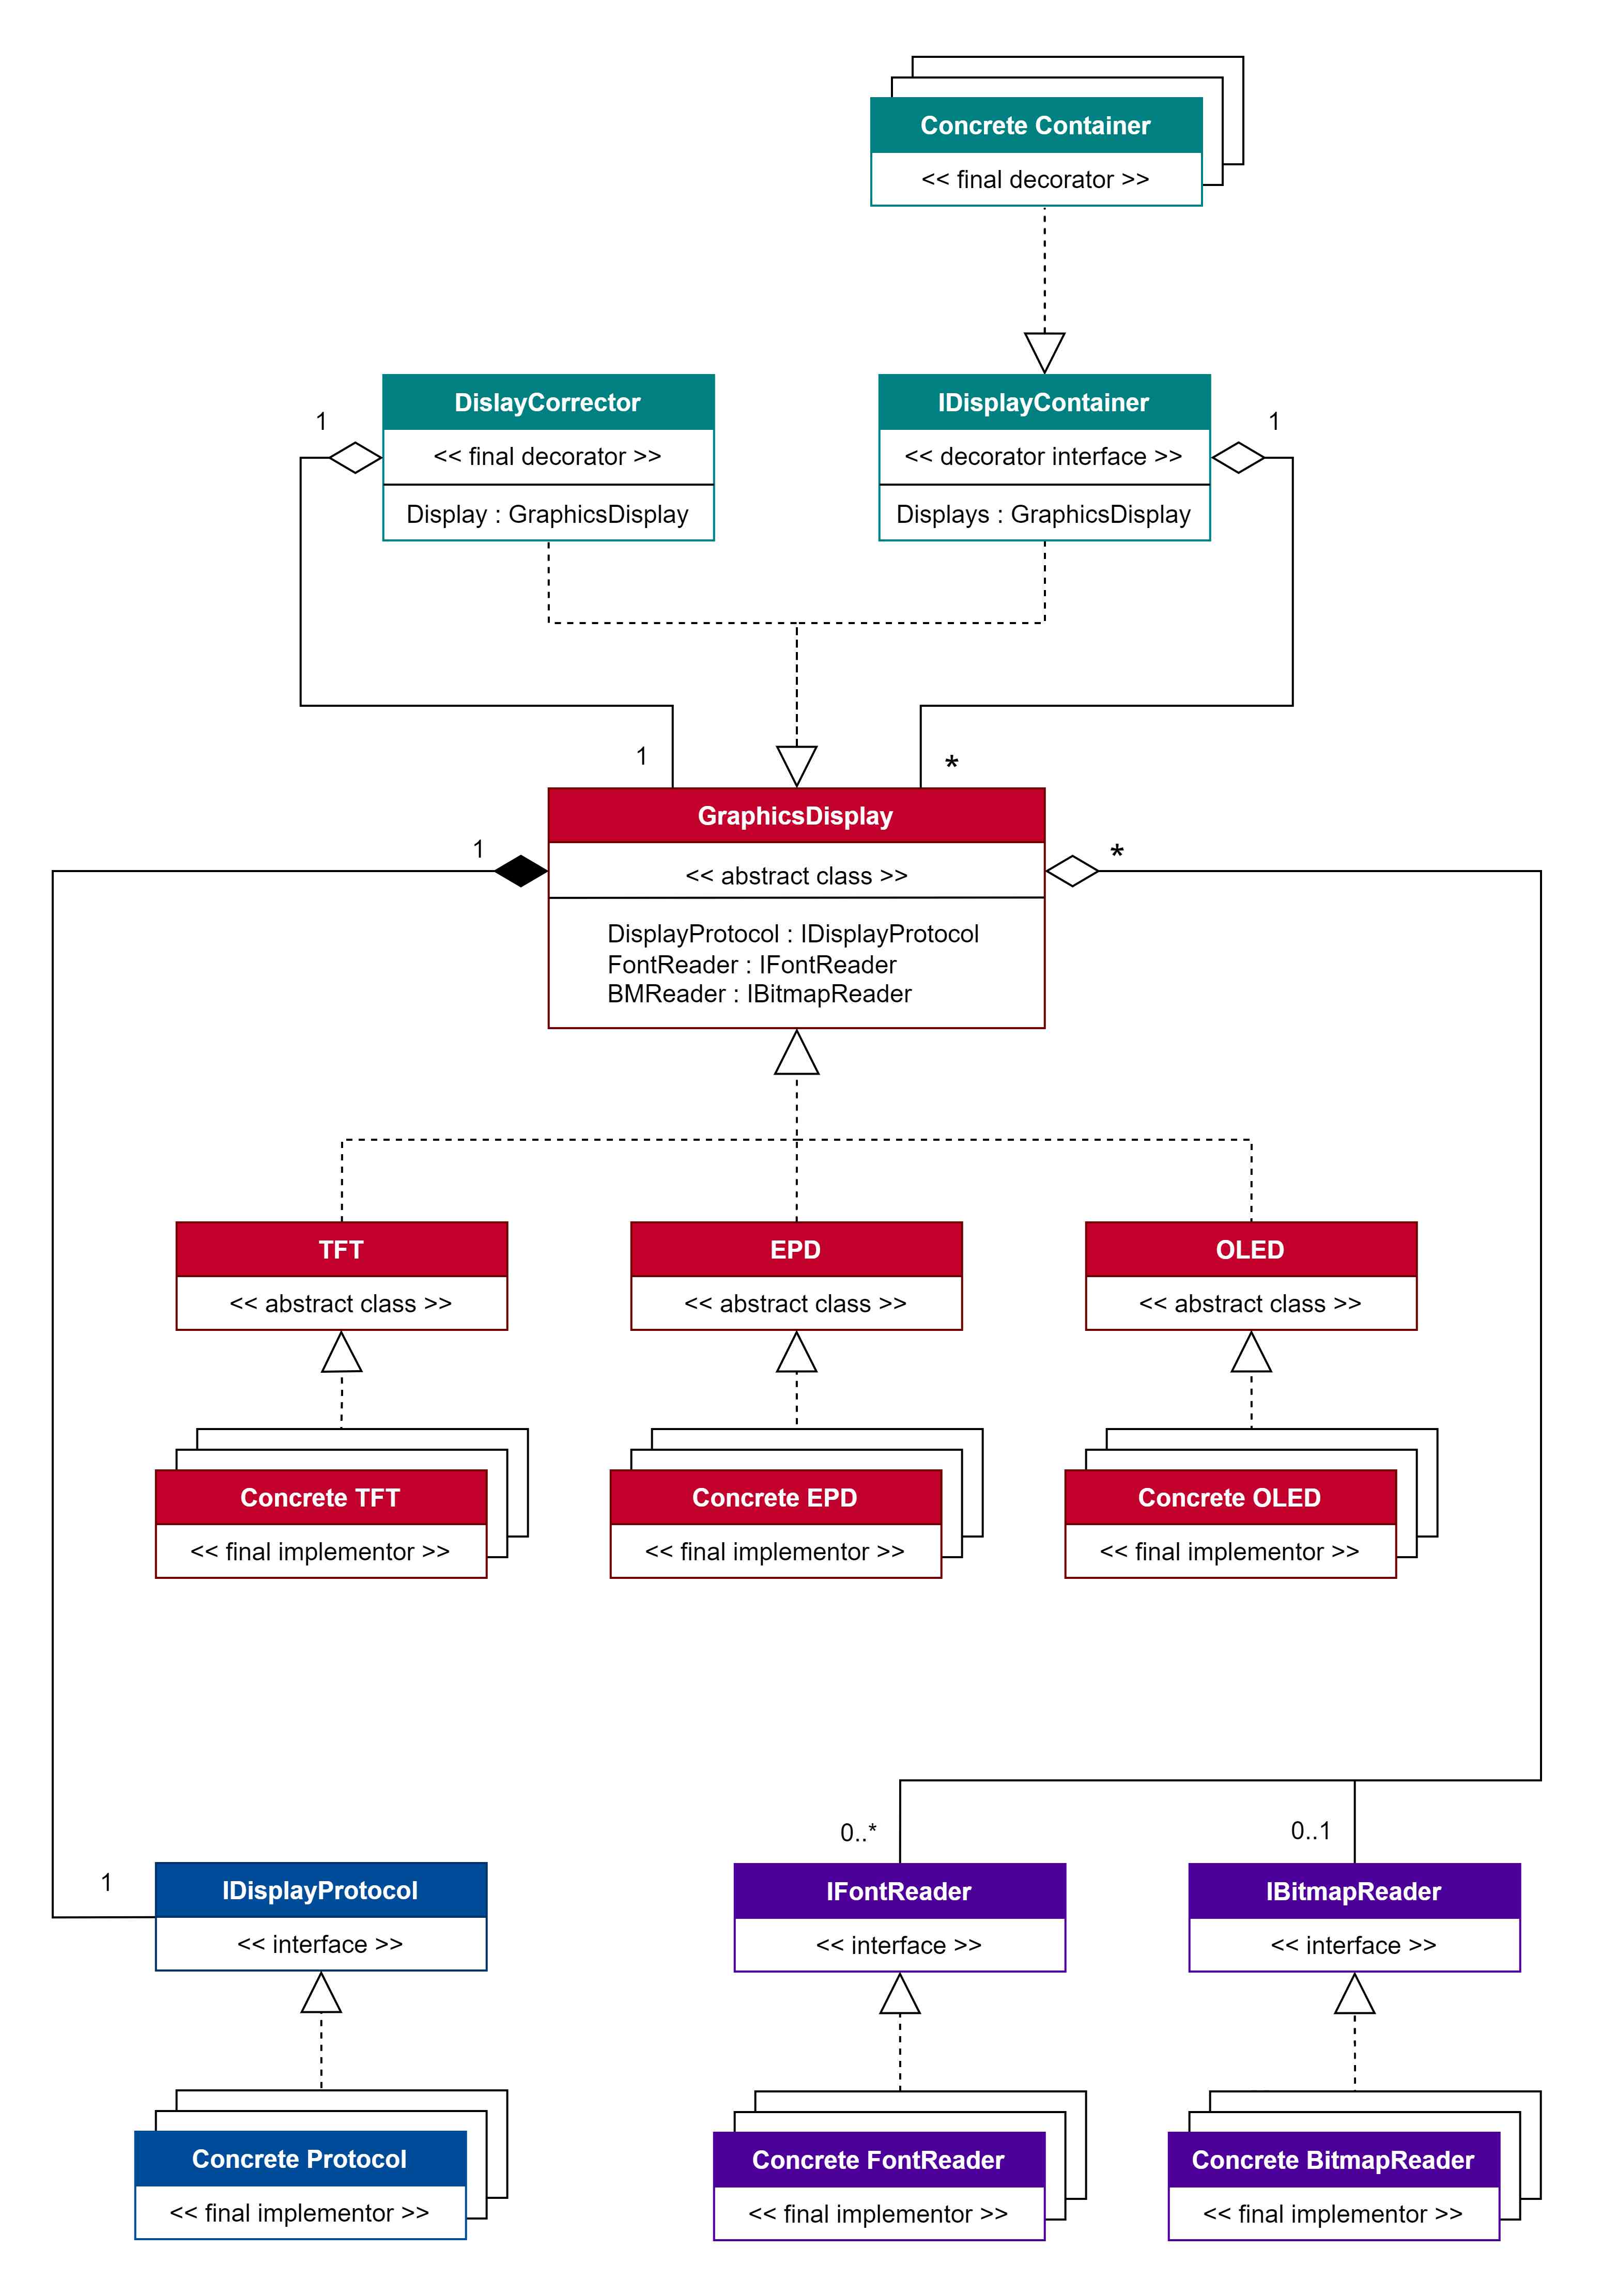
Class Diagram of UMD Library
Library and Algorithm Sources in UMD Development
In the development of the UMD library, we were building upon the object-oriented design of the UniGraphic Library, which was designed on mbed framework. To enhance our capabilities, we integrated and customized rendering algorithms and display drivers from the TFT_eSPI Library by Bodmer and Adafruit GFX Library. Our EPD drivers were built upon the e-Paper Library by the Waveshare Team.
It's worth noting that all the libraries mentioned above are distributed under open-source licenses (MIT, BSD, GNU). Therefore, you can readily employ the existing code while adhering to the respective licensing conditions.
Installation
The UMD library is compatible with the ESP32, ESP8266 and STM32 platforms when used with the Arduino framework. For the ESP32/ESP8266, the PlatformIO IDE is utilized, while the STM32 employs the STM Cube IDE.
Installation for ESP32/ESP8266 via PlatformIO Registry
- Launch PlatformIO and navigate to PIO Home.
- Select
Librariestab. - Search for
xnecas/UMD_Library. - Click on
Add to Projectand specify your project name. - Click on
Addto install the library into your project.The library will be located under.pio/libdeps/"Your Platform Name"/UMD_Library. - Finally add
lib_ldf_mode = deep+inplatformIO.inifile to ensure that all necessary libraries will be included in your project.
Direct Installation for ESP32/ESP8266
- Download or clone this library.
- Place it in the
libfolder of your project. - Finally add
lib_ldf_mode = deep+inplatformIO.inifile to ensure that all necessary libraries will be included in your project.
Direct Installation for STM32
First you need to install STM32ArduinoCore Library to establish the Arduino framework for STM32.
- Download or clone this library.
- Open/create project in STM32CubeIDE.
- Right click to project > Convert to C++.
- Right click to project > New > Folder > Advanced and check radio button "Link to alternate location (Linked folder)", then click to Browse and select, where is your downloaded library located. It is recommended to use variables in path.
- Right click to project > Properties > C/C++ General > Paths and symbols > Source Location. Click to "Add Folder..." button and select
UMD_Library, then click OK. - Right click to project > Properties > C/C++ General > Paths and symbols > Includes. Click to Add button (check "Is a workspace path") and add those paths to GNU C and GNU C++ tab:
/${ProjName}/UMD_Library
/${ProjName}/UMD_Library/MULTI_HAL
Examples
The examples for each platform can be found within the Examples folder.
These examples are divided into two categories: Initialization and Graphics.
Initialization Examples
The initialization examples are complete programs that come with all necessary modules already initialized. By simply modifying pin definitions or display drivers, you can swiftly integrate them into your project. These examples cover a range of scenarios:
- Initializing the Display with Communication Interface: Learn how to set up the display with different communication interfaces, facilitating seamless interaction. The covered configurations include:
- LCD TFT display connected via SPI interface
(TFT_SPI.md), - LCD TFT display connected via PARALLEL 8-bit interface
(TFT_PARALLEL8.md), - OLED display connected via SPI interface
(OLED_SPI.md), - OLED display connected via I2C interface
(OLED_I2C.md), - EPD display connected via SPI interface
(EPD_SPI.md).
-
Initializing Software Display Correction: Explore examples that illustrate software-based display correction techniques, enhancing the visual output
(DisplayCorrector.md). -
Initializing Multi-display Setups: Discover how to initialize and manage configurations involving multiple displays
(MultiDisplay.md). -
Sprite Initialization: Learn about initializing sprites, which are fundamental elements for interactive graphics
(Sprite.md).
Graphics Examples
The graphics examples are simple functions providing insight into the fundamental capabilities of our system's core graphics functions and content rendering.
-
Rendering Vector Graphics: Understand how to render vector-based graphics, enabling the creation of scalable and sharp visual elements
(VectorRendering.md). -
Rendering Bitmaps at Various Bit Depths: Explore diverse bitmap rendering instances across different bit depths, ensuring compatibility with varied image types
(BitmapRendering.md). -
Rendering Fonts: Grasp the techniques involved in rendering fonts on displays, crucial for displaying textual information
(FontRendering.md). -
Text Aligning and Rotating: Learn about aligning and rotating text, enhancing the visual layout and design of displayed content
(TextArranging.md). -
Creating Gradients: Explore the process of generating gradients, adding depth and dimensionality to your graphical elements
(GradientRendering.md). -
Canvas Cropping: Explore the process of cropping the display canvas to specific dimensions, allowing you to highlight the most relevant parts. This technique is essential for optimizing visual content and maintaining the desired composition of images
(CanvasCropping.md).
Author
Created by Matúš Nečas
Copyright © 2024 Matúš Nečas
 Contributors
2
Contributors
2
 Languages
 Relations

depended